How to Design a T-Shirt for Beginners: The A-Z Guide for Using SVG and PNG Files
There’s nothing quite like the satisfaction of wearing a T-shirt you designed yourself. Whether you’re crafting a unique gift, starting a small apparel business, or just personalizing your wardrobe, using a vinyl cutter like Cricut or Silhouette makes professional-quality results achievable right from your home.
But if you’re new to the world of DIY apparel, terms like SVG, PNG, and HTV can sound intimidating. This guide is your simple, step-by-step roadmap to mastering digital design files and creating your first amazing T-shirt. We’ll cover what files to use, how to prepare them in your software, and the essential steps to ensure a flawless cut. `
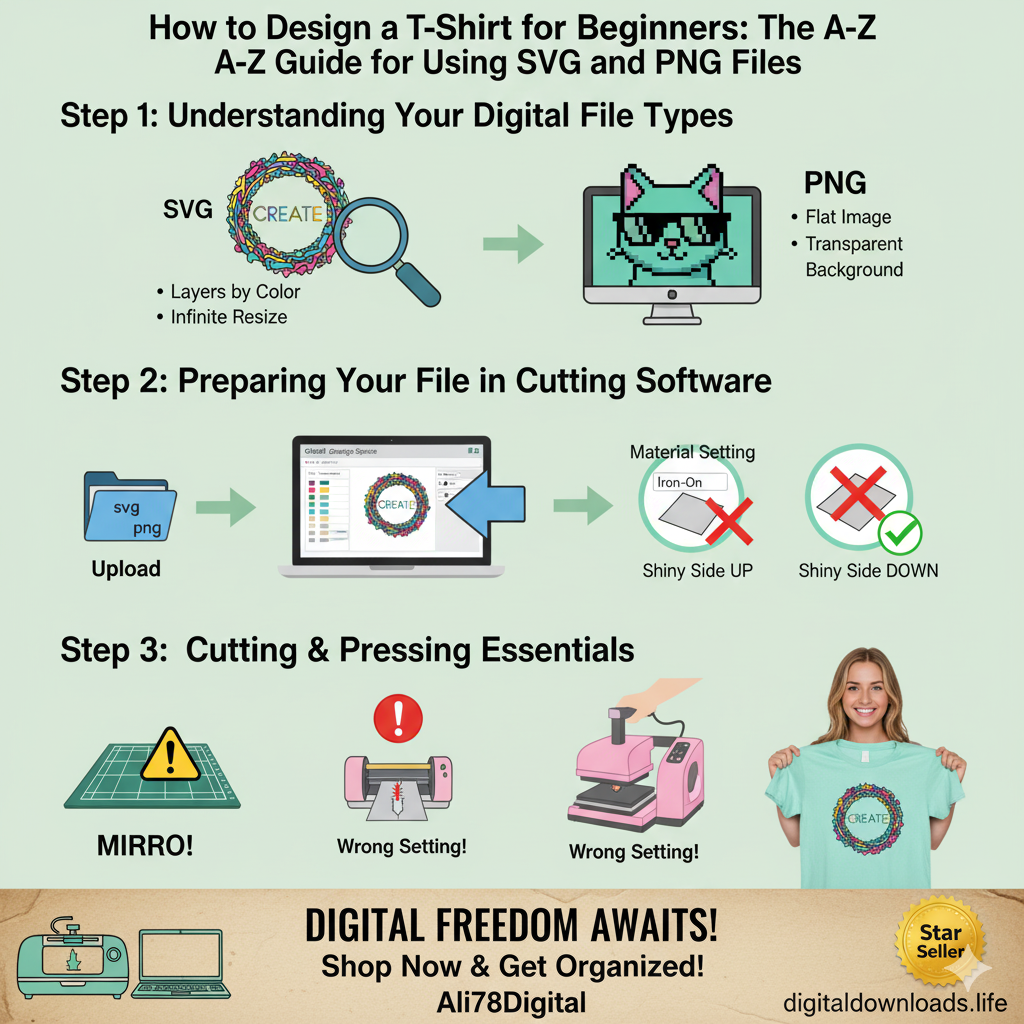
Step 1: Understanding Your Digital File Types
The first and most critical step is knowing the difference between the files you buy and what they are used for. Using the wrong file for the wrong method is the number one mistake beginners make.
- SVG (Scalable Vector Graphics): The Cutting File
- What it is: A vector file that uses math (not pixels) to define shapes.
- Best for: Cutting vinyl (HTV or permanent), paper, and cardstock using machines like Cricut Design Space and Silhouette Studio.
- Key Feature: SVGs are scalable. You can resize them infinitely without losing quality, and the cutting machine reads them as distinct color layers, allowing you to use different vinyl colors in one design.
- PNG (Portable Network Graphics): The Printing File
- What it is: A pixel-based image file (like a photo) with a transparent background.
- Best for: Sublimation printing or printing designs directly onto special transfer paper for T-shirts.
- Key Feature: PNGs support complex colors and textures that are difficult to cut in vinyl. They are “flat” images and should not be used for cutting projects where layering is required.
Where to Find Quality, Ready-to-Use Designs
Why spend hours designing when you can start crafting immediately? Our Etsy shop offers a wide range of professionally designed SVG and PNG bundles, perfect for your next T-shirt project, from holiday themes to inspirational quotes.
-> Shop Our SVG & PNG Design Bundles on Etsy `
Step 2: Preparing Your File in Cutting Software (Cricut/Silhouette)
Once you have downloaded your SVG file, the next steps occur in your machine’s software.
- Download and Unzip: Digital files usually come in a ZIP folder. Double-click the folder to extract the files (the SVG file is the one you need for cutting).
- Upload: In Cricut Design Space or Silhouette Studio, select “Upload.” Always choose the .SVG file. (If you accidentally upload the PNG, the machine will cut the outline of the square image, not the distinct layers.)
- Resize and Place: Adjust the size of the design to fit your T-shirt (e.g., typically 9-11 inches wide for an adult shirt). Place the design where you want it on your digital mat.
- Attach/Weld (If needed): If your design has multiple layers (like a quote and an icon), use the “Attach” or “Weld” features to ensure the pieces are cut relative to each other.
Step 3: The Cutting Process Essentials (Mirror, Material, Mat)
This is where beginners often make costly mistakes! Always triple-check these three items before hitting the “Go” button.
- The MIRROR Rule: When cutting Heat Transfer Vinyl (HTV) for a T-shirt, you MUST mirror the image in your software. If you forget this, your text will be backward when you iron it onto the shirt. (Sublimation printing also requires mirroring!)
- Material Setting: Select the correct material setting (e.g., “Iron-On,” “Glitter Vinyl,” or “Everyday HTV”). A wrong setting can cause dull cuts or ruin your blade.
- Placing the Vinyl: When placing HTV on your cutting mat, ensure the shiny side (the carrier sheet) is facing DOWN on the mat. The machine cuts into the dull, colored side.
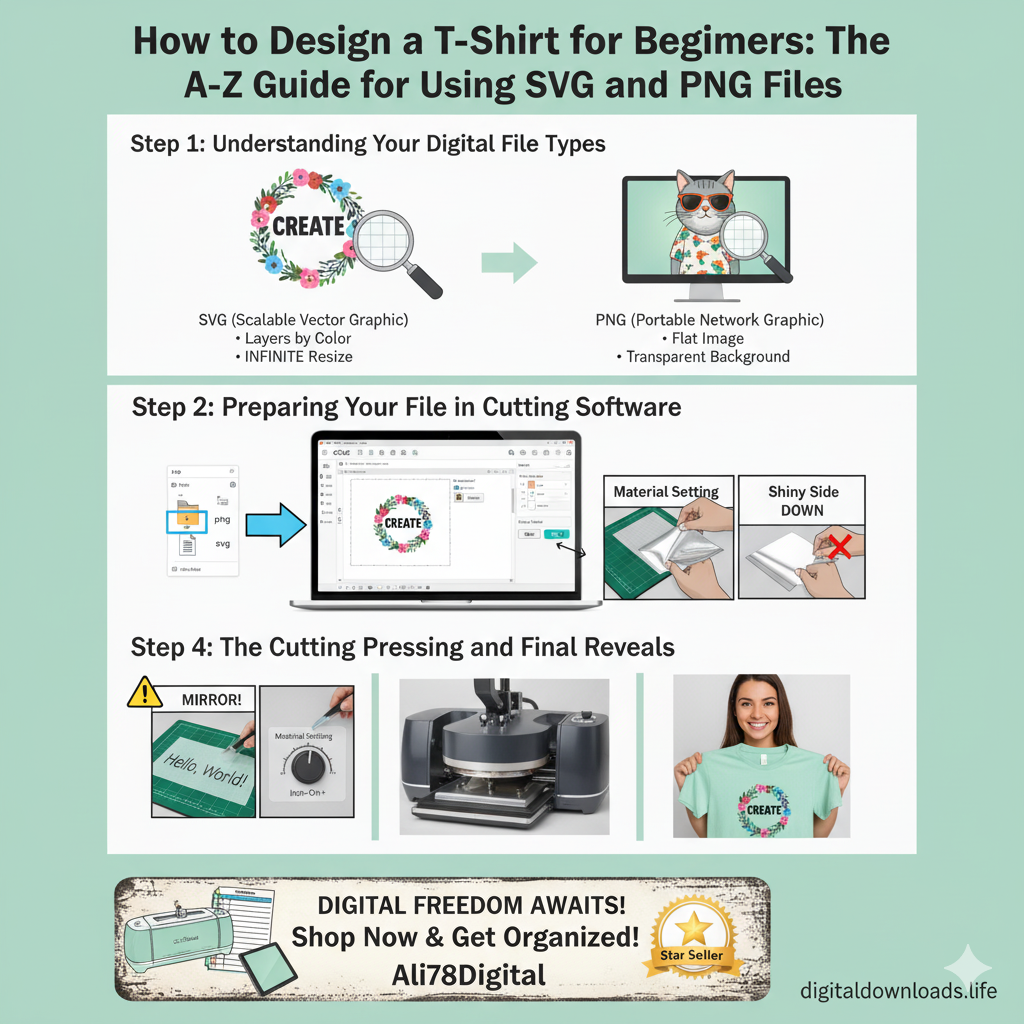
Step 4: Weeding, Pressing, and Final Reveal
The last few steps bring your design to life!
- Weeding: Carefully remove all the excess vinyl around and inside your design using a weeding tool. Be patient—clean weeding ensures a sharp final look.
- Pressing: Use a heat press or iron according to the vinyl manufacturer’s instructions. Consistency is key! Press firmly and evenly.
- The Reveal: Once cooled (or while warm, depending on your vinyl), slowly peel away the carrier sheet. Stand back and admire your professional-looking, custom T-shirt!
Common Troubleshooting Issues
| Problem | Cause | Quick Fix | | :— | :— | :— | | Cutter cut through the backing sheet. | Blade setting too high, or wrong material selected. | Lower the material setting or blade depth. | | Design looks backward on the T-shirt. | You forgot to MIRROR the image before cutting. | You need to cut a new one! Always check the Mirror box. | | Vinyl isn’t sticking during pressing. | Not enough heat or pressure, or not pressing long enough. | Increase heat and press for the recommended time. |
Conclusion: You now have the fundamental knowledge to turn digital design files into physical apparel. Whether you’re crafting simple text designs or layered masterpieces, mastering the SVG file type is the key. Don’t be afraid to experiment, and remember that we are always here to provide you with the high-quality, reliable SVG and PNG files you need for all your creative projects.
Happy crafting!
Leave a Reply